Sabado, Marso 30, 2013

I Got an Award!


My First Award! YIPPEE!!


Gabriela macramé gave me an award. Wow the first award for my blog! I would like to thank her for giving me this award. I thank the academy, my manager…oh wait this isn't the Oscars! Oh well, I can dream can I?!

Here are the 10 questions...

1: What do you like most cooking: dessert spoons or dishes?

I love cooking both!

2: What is most important to you in a person: physical or Personality:

Personality.

 3: When did you start the blog?:

 I started my blog only this march.

4: Who was the person who inspired you to get started in this world?

My Family and specially Mother she is the one thought me to crochet.

5: Do you usually follow many blogs or you get followers by others who have known you:

I am slowly gaining followers by adding them to my circle first then comment. When somebody followed my blog, I follow them back.

6: What do you like most: cook or you cook?:
I like both

7: Do you eat at home or at work?:
 Home

 8: Do you usually make vegetable recipes?
Yes, we have wet market with fresh produce.

 9: What is your best recipe?: Leche Flan, Filipino food like adobo

10th: What do you ask someone to be your friend?: 

I don’t ask somebody to be my friend. It should come naturally

11: What is the best movie you've seen?:

I am not into movies. 

And here are my winning blogs! Drum roll please! Sorry I did not pick 20 blogs..


Huwebes, Marso 28, 2013

My Very First Amigurumi Wedding Couple

I am very excited when I heard the news that my youngest sister Bobbie is getting married. the first thing came to my mind is Amigurumi Couples! So I asked her if she wants one she said yes! Now I have my first customer! YAY! I told her to tell me what she will wear and how her hair will look like, so I will have ideas on what to crochet. 

I used 2 strings of Monaco Crochet Cotton Mercerized 


So I bought the materials and by now I have one bald head finish...
The hook I used size C (2.75 MM)

I am very excited for my sister getting married, and excited to finish my very first amigurumi wedding couple.


              Congratulations Bobbie and Robert!


Linggo, Marso 24, 2013

So Cute Lazy Bear Coin Purse- My WIP


I made this coin purse and still tweaking a little before I post the pattern... 


KAWAII!! Lazy Bear Coin Purse


Cuteness!! this lazy bear loves to sleep all day! even wears his PJ's all day... 


Like my facebook page...
Zzzz....

Huwebes, Marso 21, 2013

Crazy Crochet Bedroom Slippers


I made this slippers because I love my cozy crochet slippers I showed you on my very first blog post. But It is summer here in the Philippines (ALL YEAR LONG!) , so I made summer friendly crochet slippers. I love how It looks and feels on my feet. It easy to make and easy to decorate even though I used crazy color combinations I still love it. You can combine any color you want! In this project  I used my leftover stash so I don't have to go outside and buy one.. Here is how you make a crochet slippers...

You will need:


4 Monaco Cotton thread yarn

G hook 
Yarn needle
Rubber foam for the soles

Abbreviations:


dc- Double crochet

hdc- Half double crochet
sc- Single crochet
ss- Slip Stitch
ch- chain

* This is made 4 threads held together


Sole (make 4)


make a ch 30


Row 1- dc in 4th ch from hook, 1 dc in each of next 25 ch, 5 dc in last chain, working the remaining loop at the opposite side of foundation chain, dc in each of next 25 ch, 3 dc in last ch,  ss on top of ch 3. 


Row 2- ch 3, 1 dc in same space as last ss, 2 dc in next dc, 1 dc in each of next 25 dc, 2 dc in each of next 5 dc, 1 dc in next 25 dc, 2 dc in each of last 3 dc, ss on top of ch 3


Row 3- ch 3, 1 dc in same space as last last ss, 2 dc in each next 3 dc, 1 dc in each next 4 dc, 1 hdc in next of 4 dc, 1 sc on each next 13 dc, 1 hdc on next 4 dc, 2 hdc in each 10 dc ( this will be the heel part), 1 hdc in next 4 dc, 1 dc in next 4 dc, 2 dc in each of next 6 dc, ss on top of ch 3. Fasten off ( this will be the toe part )


Upper (make 2)

Ch 23
Row 1: 1 dc on 4th ch from hook, 1 dc in each ch to end of ch. Turn
Row 2: ch 3 ( counts as dc ) 1 dc in each dc across, Turn
Row 3-4: repeat row 2
Row 5: ch 3(counts as dc) 1 dc in each dc across, DO NOT TURN
Row 6: ch 1, make a  sc in each dc across top and bottom edge.
Fasten off.

Assembly:
*Cut 2 pieces of rubber foam in the same size and shape as the crochet sole.
* Put together the 1st crochet sole, rubber, then 2nd crochet sole, then sc around. Fasten off
* Sew the upper on the side of the  complete sole.

If you have questions or found something confusing on my pattern please let me know feel free to comment. Thank you


6cbfafd5e45003120a3916a16161181231f1d78526ff1686e5

Linggo, Marso 17, 2013

Cellphone Eating Monster!

Cellphone Eating Monster
I made this cellphone cozy last night. I was inspired to write again a pattern because of the numbers of views and share of my free pattern of Kawaii Easter Bunny Coin Purse. I never thought that my first pattern will be read by a lot of people. Having feedback like that keeps me going! I hope you will like my Cellphone eating monster


This green little monster looks hungry!

You will need:

2 different color Monaco 4-ply worsted weight yarn
white Monaco 4-ply worsted weight yarn for eye and teeth
A size K crochet hook 
A size G crochet hook
Yarn needle
Black yarn for sewing 
Buttons for the eyes

Abbreviations:

hdc- Half double crochet
sc- Single Crochet
ss- Slip titch

*We will be working this pattern in back and fort
*using 2 yarns held together

Body (make 2)

Foundation: Make ch 12

Row 1: hdc on 3rd chain from hook, 1 hdc on each ch. ch 2 turn

Row 2: 1 hdc on each hdc, ch 2 turn

Row 3-10: Repeat Row 2

Fasten off

Head 

Foundation: Make ch 12

Row 1: hdc on 3rd chain from hook, 1 hdc on each ch. ch 2 turn

Row 2: 1 hdc on each hdc, ch 2 turn

Row 3-8: Repeat row 2

Fasten off

Eye 

Worked in continuous round

Using the G hook

Foundation: With 1 white yarn only ch 3 

Row 1: hdc on 3 ch from hook, make 10 hdc, do not join. 10 hdc

Row 2: 2 hdc on each hdc, do not join. 20 hdc

Row 3: *1 hdc on 1st hdc, 2 hdc on next*, repeat * 10 times.  30 hdc

Tooth

ch 2, sc on 2nd chain from hook, make 3 sc, 1 hdc, 3 sc, ss on top of ch 2. Fasten off

Assembly

1. With the right side facing together sew the 3 sides of the body. Bring the right side out.

2. Fold the head part in the middle with the right side inside. Sew the 2 sides.

3. Sew the button on the eye.

4. Attach the eyeball on the head part with a blanket stitch. 

5. Sew the tooth in the mouth.


6. Sew together the head and the body part . Sew it for just a half-inch in the middle.


Sew together the head and the body part . Sew it for just a half-inch in the middle.


If you found any mistake on my pattern please leave a comment below. Thank you and Happy Crocheting


Huwebes, Marso 14, 2013

Kawaii Easter Bunny Coin Purse


Easter is coming, and I think it is time for me to write a pattern for me to share. When I make some of my projects I don't write it because I'm too busy crocheting and later before you know it I forgot to take down notes.  This is my very first time to write my own pattern. I made this pattern for the coming Easter. I think it is a small crochet project but it is useful and cute! the egg is used as a zipper pull. I hope you like my very first pattern!


Kawaii Easter Bunny Coin Purse


4ply worsted weight yarn (Any color you want) I used light pink and medium pink I used only left over yarn from previous projects, small amount of yarn for the egg, the nose and ribbon (any color you like)

Boye G/6-4.25 Hook

2 Black buttons

Zipper

thread and needle for sewing the zipper and button

ABBREVIATIONS
Ch- Chain stitch
Sc- Single crochet
Hdc- Half double crochet
ss- Slip stitch
st- stitch

This coin purse is done in continuous round no joining at the end of each round.

Coin Purse

With G6 Hook and Medium pink color make 2 ch
Row 1: 10 sc into 2nd chain from hook. DO NOT JOIN. 10 sts.
Row 2: 2 sc into each sc to end. 20 sts
Row 3: Place marker so you will know where is the beginning of your row. (1 sc into next sc, 2 sc into next sc) 10 times. 30 sts
Row 4: 1 sc into each sc to end. 30 sts
Row 5-10: same as row 4. Fasten off. 30 sts in each row

Bunny Ears  (Make 2)

With G6 and light pink yarn make 6 ch
Row 1: 1 sc into 2nd chain from hook, 1 sc into each of next 3 ch, working 4 sc in 4th chain. Working back along other side of foundation chain: 1 sc into next 4 ch, ss to first sc. Fasten off leave a long tail for sewing.

Egg

With G6 and any yarn color you like Ch 2
Row 1: 8 sc into 2nd chain from hook, ss into 1st sc
Row 2: Ch 2, hdc in the same space as ch 2, 2 sc into next 7 sc, ss into top of ch 2.18 sts.
 Fasten off leaving a long tail for sewing.

Sew on the Button eyes, ears, and the zipper. Sew the egg on the zipper pull.


If you found any mistake in my pattern, don't hesitate to leave a comment. 


Miyerkules, Marso 13, 2013

Basic Crochet Stitches-Part 2


In my last post I taught you how to make a slip knot, chain stitch and single crochet. Now I will show you how to make a Half Double Crochet, Double Crochet and Treble Crochet. 


HALF DOUBLE CROCHET (hdc)

Work a half double crochet in each following chain across, making sure foundation chain is always flat with V's facing you.

Half double crochet is twice as tall as a single crochet, but is shorter than a double or triple crochet. It is very simple to learn.

Here's how to make half double crochet:


Begin with a foundation chain of 10 stitches
Yarn over, insert hook in 3rd chain from hook. (Picture 1)

Picture 1

Yarn over hook and draw loop through stitch. there are now 3 loops on hook. yarn over hook again and draw loop through. (Picture 2)


Picture 2


One half double crochet made and one loop remains on hook. (Picture 3)


Picture 3

Work a half double crochet in each following chain across, making sure foundation chain is always flat with V's facing you.


DOUBLE CROCHET (dc)

Double crochet (dc)

Double crochet is 3 times taller than single crochet and taller than half double crochet. It's easy stitch which works up quickly because it is taller , so there are less rows of work.


Here's how to make a double crochet:

Begin with a foundation chain of 10. Yarn over hook, insert hook on 4th chain from hook. (Picture 1)


Picture 1


Yarn over hook and draw loop through first 2 loops on hook. ( Picture 2)


Picture 2


There are now 2 loops on hook. Yarn over again and draw loop through both loops on hook. ( Picture 3)


Picture 3


One double crochet is made. Work one double crochet in each each remaining chain across, making sure foundation chain is kept flat with V's facing you. (Picture 4)

Picture 4


TREBLE CROCHET (tr)


Treble crochet has one more step than double crochet, making it the tallest of the previous crochet stitches.

Here's how to make a treble crochet:

Make a foundation chain of 10.


Yarn over hook twice, insert hook in 5th from hook. (Picture 1)


Picture 1


Yarn over hook and draw loop through stitch. There are now 4 loops on hook. Yarn over hook and draw loop through first 2 loops on hook. There are now 3 loops on hook. (Picture 2)


Picture 2


Yarn over hook and draw loop through next 2 loops on hook. There are now 2 loops on hook.(Picture 3)


Picture 3

Yarn over again and draw loop through both loops on hook.


Picture 4
One treble crochet made and one loop remains on hook. (Picture 4)
Work one treble crochet in each remaining chain across, making sure foundation chain is kept flat with V's facing you.


On my next post I will teach you how to Slip stitch, Increase and decrease. and I hope by next week if I am brave enough I can make my own video tutorials...


Lunes, Marso 11, 2013

Basic Crochet Stitches-Part 1


The Crochet Stitches


<crochetstitch>
Once you've got the hang of one crochet stitch you'll find it easy to learn other crochet stitch.

Crochet is very simple and consist of just a few different types of stitches. Once you've got the hang of one stitch, you'll find it is really easy to pick up the others.


Starting The Work

Always remember we should start every crochet stitch with slip knot. Here's how you going to make a slip knot. 

<slipknotp1)
Picture 1
To make the first stitch, by forming the yarn end into a loop and hooking the ball end of the yarn through this loop (Picture 1)


<slipknotp2>
Picture 2

Gently pull on the free end of the yarn (not the end leading to the ball ) to tighten this first stitch around the body of the hook.  (Picture 2)

<slipknotp3>
Picture 3
You are now ready to make next lot of stitches. (Picture 3)

All the following stitches should be worked using the length of the yarn that leads to the ball, leaving the free (cut ) end of the yarn to be used to sew a seam later if required


Chain Stitch ( ch )

<chain(ch)>
Chain Stitch (ch)

A crochet chain Is often used as the base for all the following stitches but it can also used within a stitch pattern.
 
To make a chain stitch:
Take the yarn end that leads to the ball over the crochet hook wrapping it over, in front and under the hook. (Picture 4)

<chainp1>
Picture 4

Now draw this loop through the loop on the hook to make the chain stitch. (Picture 5)

<chainp2>
Picture 5
Continue this way until the required number of chain stitches have been completed.(Picture 6)


<chainp4>
Picture 6


Single Crochet ( sc )


This is possibly the most basic of crochet stitches.

To make a single crochet;
Insert the hook into the work, underneath a chain stitch on the previous row. (Picture 7)


Picture 7

Wrap the yarn over the hook in the same way as for a chain stitch. (Picture 8)
Picture 8

Draw this new loop through the work-you should now have 2 loops on the hook. (Picture 9)

Picture 9
Wrap the yarn over the hook  and pull through 2 loops to complete the stitch. (Picture 10)

Picture 10


I hope you practice this stitches. On my next post I will teach you how to make a Double Crochet, Half Double Crochet, Treble.

Quirky Hats...Again :)


Sabado, Marso 9, 2013

Gauge

GAUGE


The size of  finished piece of crochet is controlled by how tightly packed together the stitches and rows are, It is called gauge. It will also determine the size of the finished item and how many yarn you will need.


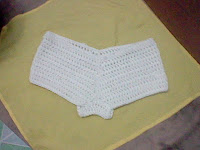
<crochet_boyshorts>
Crochet Boy shorts

Here's how you will check your gauge:

  1. Make a small square of crochet in the stitch used for the garment, using the yarn and the required crochet hook given in the pattern. make a swatch at least 6 inches(15 cm) square so that you can easily count the stitches and rows.
  2.  Once completed the crochet square, mark out with pins the number of stitches the gauge section of the pattern states there should be 4 inches(10 cm).
  3.  Measure the distance between the pins-if this measurements is 4 inches(10cm) your gauge is correct and you go ahead using that size crochet hook.
  4.  If the distance between the pins is less than 4 inches(10 cm), you are crocheting too tight and you need to make another swatch using bigger crochet hook.
  5. And if the measurement is more than it should be, you crochet is too loose and you will need to use smaller hook.


Gauging is important if you are crocheting clothes. Because if you don't follow the gauge, the garment you are making will be bigger or smaller. It happened to me!! I made a tunic for my 3 year old daughter but the tunic will fit a 10 year old! In amigurumis, beanies, gauge is not that important.


Huwebes, Marso 7, 2013

Introduction to Crochet

<crochet>

Introduction

Crochet is fun! It's quick and easy.You can easily work sphere, tubular, triangular, rectangular among other things you can create.
It is not hard to learn to crochet. You just need to learn the basic stitches and once you got the hang of one stitch, you will find it is really easy to pick up the other stitches.


What you need...


<crochet>
Just a simple hook and yarn you can make a lots of things


Crocheting doesn't need complicated equipments. Just a pattern, and a few simple things the pattern will tell you what you will need and how many yarn or thread to buy and what size hook you will use. Crochet hooks can come in a different sizes they are measured by US and Metric and UK

CROCHET HOOK CONVERSION CHART

<crochethook>

Abbreviations

When reading a pattern you will need to learn how to read crochet abbreviations. It's kind of shorthand for crochet. All the technical terms are shortened and abbreviated. It is standard to almost all crochet patterns. There are called differently in UK and in American.


On my next post I will teach you what is the importance of gauge or tension in crocheting.


Martes, Marso 5, 2013

My First Crochet Post

Crochet By Jei

I Am Jei 34 years old. A wife, mother of 3 and new to crocheting. I am from the Cavite Philippines. I started to crochet when I was in grade 5, but I did not pursue it because I was so confused! But my mom is so good with the hook! she makes a table doilies without a pattern. I was I thought that in crochet you can only make doilies. Then only last year when I surfed the web. then BOOM!!! Different blogs, patterns and wearable crochet are available in the web! Then I got hooked on crochet!. As months passed I started on making coin purses, cellphone cases, small amigurumis, bags, and hats. I also tried to crochet tunics for my daughter and character hats for my 2 sons. My goal for this blog is to learn to write my own pattern and share it to other crocheter in the world.  

These are some of my works...Thank you to my son Jion for modeling some of my creation


<pokemoncrochet>
Lucario Hat


<adventuretime>
Finn the Human Beanie


 My Cozy Crochet Slippers